Today I want to show you how a Convolutional Neural Network (CNN) can be used to predict honeybee subspecies with impressive accuracy using photos (of really poor quality). Afterwards, we'll build a little app around the algorithm and put it on a sharing platform so it's available to anyone and everyone on the web.
What do we need for this?
The data basis was the BeeImage dataset from Kaggle. To create the CNN, I used the Python deep learning library Keras. For the app, I used Streamlit, a Python framework for machine learning apps. Last but not least, the app was then pushed into a GitHub repository and Streamlit Sharing was granted access to it. Done 🙂
And this is what it looks like:
If you want to try the whole thing in action, just click here.
But before we start coding, a basic question: what are CNNs?
CNNs
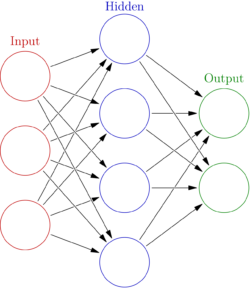
CNN stands for Convolutional Neural Network, a special type of artificial neural network (ANNs; "a" for artificial). ANNs form the basis of deep learning and are based on the idea of emulating the architecture of the brain. Such ANNs (see below for a simplified representation) are used today in various forms and topologies for a variety of complex tasks.
CNNs are nowadays primarily used in the processing of image and audio files (e.g., face recognition or machine translation). Why is this?
CNNs mimic the visual cortex of the brain in their functioning. Neurons on a higher layer receive their information from neurons on lower layers, whereby not every neuron is connected to all neurons on the next layers (i.e. partial linkage -> thus less parameters/computational power needed). For example, one layer could learn to distinguish straight lines from curved ones, and the next higher layer could learn to assemble rectangles or circles from these shapes. Further layers could then abstract even more complex patterns (e.g., distinguishing dog vs. cat).
To achieve this, CNNs use special layers, convolutional and pooling layers. To explain their exact functionality is beyond the scope of this post. However, I can recommend the very good introduction to the topic and the implementation in Python by Aurélien Géron (Hands-on Machine Learning with Scikit-Learn, Keras, and TensorFlow; O'Reilly).
Let the coding begin
I don't want to go into detail about the preparation of the data here, since the BeeImage dataset has already been covered in numerous tutorials. I prepared the data largely in accordance with Gabriel Preda's notebook on Kaggle (which is also where the helper functions used in the code below come from). The only significant difference is that I removed the "subtypes" -1 (= subspecies unknown) and Mixed local stock from the dataset. To me, it just doesn't make sense to train an algorithm on such labels (which aren't really labels) and lose predictive power.
Subsequently, I played around with some CNN architectures and finally landed on a model with three convolutional layers with relatively high dropout that achieved over 99% accuracy in predicting the test set (20% of the original data not used to train the model).
This model then looked like this in Keras notation:
model=Sequential()
model.add(Conv2D(16, kernel_size=3, input_shape=(100, 100,3), activation='relu', padding='same'))
model.add(MaxPool2D(2))
model.add(Dropout(0.5))
model.add(Conv2D(16, kernel_size=3, activation='relu', padding='same'))
model.add(Dropout(0.5))
model.add(Conv2D(16, kernel_size=3, activation='relu', padding='same'))
model.add(Dropout(0.5))
model.add(Flatten())
model.add(Dense(y_train.columns.size, activation='softmax'))

model.compile(optimizer='adam', loss='categorical_crossentropy', metrics=['accuracy'])

train_model  = model.fit_generator(image_generator.flow(X_train, y_train, batch_size=32),
                        epochs=70,
                        validation_data=[X_val, y_val],
                        steps_per_epoch=len(X_train)/32,
                        callbacks=[earlystopper, checkpointer, annealer])
The trained model can then be easily saved to make predictions in the app. I have found that it makes sense to save the model configuration in .json format and the model weights in an additional .h5 file. All other formats and constellations led to problems when the model was loaded again.
model_config = model.to_json()
with open("model_config.json", "w") as f:
    f(model_config)
model.save_weights("model.h5")
And another lesson learned: the current version of the h5py library does not work correctly when loading Keras models. Therefore, be sure to roll back to a functional version.
And now we're going to build our app. Streamlit's syntax is really easy to learn and the library's documentation really leaves nothing to be desired. The only issue that was a bit tricky was saving session states. Streamlit apps reload every time you enter input. But that's a problem in our case. I wanted the user to first load a random bee image via a button. Then the user is allowed to guess and click on one of the subspecies available for selection. But by default, the second click would have lost the result of the first. This was solved by the module SessionState.py, which can be downloaded here and saves intermediate states. Problem solved 🙂
Below you can see the final code for the app. Don't be scared, most of it is text, loading images and a bit of styling. The only slightly more complex code comes when buttons are in play whose state is cached via SessionState and the prediction with the CNN. That's it.
If we now put this app file together with all the other necessary files (SessionState.py, the two model files from above, a .csv with the image labels, a requirements.txt (which is simply a list of all the Python libraries needed for the app) as well as a folder with the test images and one with all the other required images) into one folder, we can theoretically use the app locally.
But that was not the goal of this exercise. The app is supposed to go out into the World Wide Web. But the new platform Streamlit Sharing makes this very easy for us. We simply push all the files/folders mentioned above into a GitHub repository. If you've never heard of Git or GitHub, I highly recommend the Git Complete Course by Jannis Seemann on Udemy. You can find the repo for the app here. The readme file of the repo also explains how to get the app running locally on your computer.
Now all I had to do was apply for an account at Streamlit Sharing, where you can currently host up to three Streamlit apps for free, and link the GitHub repo to my account. Done 🙂
Here is the link to the app hosted on Streamlit Sharing. Now feel free to try beating the trained CNN at recognizing subspecies of honeybees. I know who I'm betting on 😉
If you have any questions, comments, ideas about this post, feel free to drop me a line.